
In my homelab I try to use as little electricity as possible, not just because I live in The Netherlands and electricity is expensive, mostly because the house I live in is (climate/CO2) neutral and only has 6MWh of electricity per year available from the sun. Due to this I’d rather not have multiple servers continuously running, I much rather have just one piece of hardware. Since I wanted to have a NAS too, I figured I’d try to combine both in one physical server!
Disclaimer:
FreeNAS does not support running inside a VM for production.
VMware does not support RDM functionality with local disks.
Why FreeNAS
Some of you may have searched for NAS software, it’s likely that you ran into FreeNAS during your search. Packing ZFS technology for the storage layer, it’s completely different than your average hardware RAID card in most servers. It has a nice UI, iSCSI, NFS, everything you’d want from a NAS perspective (even VM support and “Jails”). The reason I went with FreeNAS is because of the whole package and my interest in ZFS with all it’s features.
Now for people having done more extensive research, you might have noticed their community forums are not so much of a happy place for people trying to run FreeNAS in a VM and asking questions about it. The reactions and links being posted to such questions are mostly based on ancient knowledge and not true for today, some even manage to claim the exact opposite of what the actual developers of FreeNAS say. I’m sure they mean to help, but I found that you shouldn’t write off FreeNAS because of this. I hope writing this blog will give you the correct information, unlike what can mostly be found online.
Requirements
Naturally FreeNAS has a few requirements, most are nothing special but there are a few specifics. Make sure you verify all this up front, finding out your server hardware is insufficient halfway through can get quite expensive. FreeNAS has hardware requirements you actually have to think about before buying your server.
Processor
Mostly any modern processor will work fine. Inside a VM it can run on a single vCPU without problems. To give you an idea about performance, with a Xeon D-1541 @ 2.10GHz I can saturate 10Gb/s with a single core. I personally haven’t tested with encryption or higher bandwidth, but obviously, the faster your CPU the more performance you will get. I gave my FreeNAS vm 2 vCPU’s just to make sure I don’t get any performance problems.
Oh yes, before you ask, 32bit x86 CPU’s are not considered modern…
As goes for any other VM, don’t give a VM more vCPU’s than it needs. The more you give, the lower the per-core performance gets due to scheduling. For example, a VM with 2 vCPU’s running at 60% load will perform better than a VM with 8vCPU’s running 15% load.
Memory
Now here’s where it gets interesting. Online you will find ginormous amounts of memory to supposedly be required by ZFS. My personal favorite you find everywhere when you search for memory requirements: “Rule of thumb for FreeNas is 1GB ECC RAM per 1TB of storage space”. Forget it, that’s bollocks!
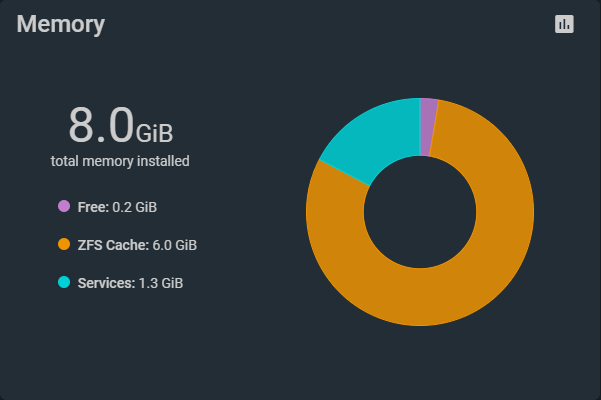
First of all, what amount do you need? The developers of FreeNAS state that 8GB is the minimum and it does not have to be scaled up based on storage size. To give you an idea, I’m currently running 8GB on the VM with 46TB of raw storage spread over 7 disks. As you can see on the screenshot, 1.3GB of memory is in use by FreeNAS services, 0.2GB of memory is still available and a whopping 6GB is reserved for cache. Don’t ask me about the missing 0.5GB.
Now here comes the catch, if you want to run deduplication on a few TeraBytes of data, this is where the memory requirements come in. Some calculations show that, depending on the type of data, 1TB of data could possibly use up 5GB of memory using deduplication. It can also use as little as 0.5GB though. Conclusion is, deduplication is costly and you should ask yourself if you need it.
Next up, ECC vs non-ECC. Both work, but ECC is recommended to avoid errors in memory to potentially corrupt your whole storage. My personal view on this is, it all depends on how big you see the risk. In terms of numbers I’ve not seen many memory sticks go bad, 99% of the bad ones arrived in that state. FreeNAS works perfectly fine with normal non-ECC memory as long as you accept the risk that it could possibly, once in a lifetime chance, corrupt data. If you don’t want to take that risk, just go with ECC.
Disks (and RAID/HBA’s)
Now all of the above is pretty important, but where ZFS shines is the ability to manage the physical harddisks and overlaying the software RAID. This means that in absolutely all cases, no exceptions, no hardware RAID is allowed on the server! I can’t stress this enough, your RAID- or onboard controller has to be able to pass through the disks to the OS directly without any form of hardware RAID. The direct passthrough is often called JBOD. For most known RAID-controllers this is often referred to as IT-mode, not all RAID-controllers are capable of this, some may need to have their firmware flashed first, so choose wisely.
As for the actual disks, it’s your choice to go with SAS or SATA, it actually does not matter, all are supported. I’m running a combination of Enterprise SAS spinning disks and consumer grade SATA SSD’s. Also, my personal view on disks for any NAS system, please stay away from desktop drives (like WD Green and Blue) and get some good working storage, they don’t have to be that expensive. I would always prefer a refurbished enterprise HDD over desktop drives.
Installation
Now that all requirements are out of the way, a small baseline of what I used for this build and blog:
- Intel Xeon D-1541 @ 2.10GHz (8 cores, 16 threads)
- 128GB DDR4, ECC-Registered memory
- 2x 10Gb/s SFP+ networking
- Embedded LSI 3008 RAID controller
- Embedded Marvell SATA controller
- 1x M.2 NVMe XPG GAMMIX S11 Pro 256GB (Consumer grade)
- 1x M.2 NVMe XPG GAMMIX S11 Pro 512GB (Consumer grade)
- 3x 14TB Seagate EXOS X16 SAS (Enterprise grade)
- 4x 1TB Samsung 860 EVO SSD (Consumer grade)
- ESXi 6.7 Update 2
LSI 3008 RAID controller
This one is a bit special and I guessed/hoped it would work. The LSI 3008 controller is normally a physical add-on card for a PCIe slot, however, my motherboard has an embedded version of it and wasn’t sure how it would function. I just expected it to work the same as a physical card, which was confirmed after some testing. Unfortunately it had no possibility to use JBOD out of the box, fortunately it is based on the LSI 9300-8i controller which can be flashed to IT mode. After flashing, the controller is ready to go, if you need help with flashing, please do a search on the internet, there are countless tutorials available.
Marvell SATA controller
This simple SATA controller already works as JBOD out of the box, there’s nothing else required to configure. Unfortunately, during the PCI passthrough configuration of this controller I noticed it didn’t disappear from the ESXi UI as an HBA. After some extensive research this Marvell controller has firmware problems that doesn’t allow it to be virtualized/passed through. My plan failed, as I require the disks directly passed to the FreeNAS VM. There was one solution left, which is setting up RDM in ESXi. More on that later.
M.2 NVMe 256GB
Just because it’s possible I’ve added the 256GB NVMe SSD to the PCI passthrough. I will try to use this in the future as a caching solution inside FreeNAS, for now I just prepare it to be used and don’t actually use it yet. Maybe more on this in a following blog post. The reason I’m not using it yet is because FreeNAS already reserves memory for caching purposes. Since the current amount of memory is sufficient for cache and way faster than NVMe I have not yet required an additional caching mechanism.

FreeNAS VM
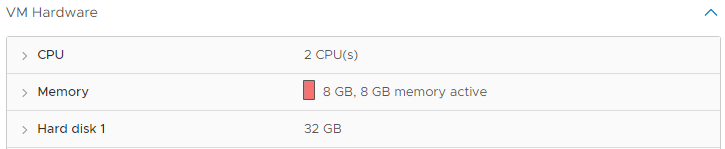
To start the installation of FreeNAS I created a VM with 2vCPU’s, 8GB memory and a 32GB Hard Disk. No other devices attached yet. Downloaded the latest FreeNAS version from the FreeNAS website and mounted the ISO to install the OS. Was as easy as one, two, three. Before I knew it I was browsing the web GUI. FreeNAS immediately grabs all the memory it can get, but as you can see in the screenshot about memory above, it doesn’t necessarily mean it’s not enough.
Networking
The FreeNAS requirements also state that a minimum of one physical network port is required. This is based on a bare-metal install in a production environment. A lot of community answers tell you to dedicate a physical network port to the FreeNAS VM using passthrough. For ESXi, this is not true and really not necessary. ESXi internal network speed is way higher than your average physical network adapter. Maybe there are other hypervisors out there that might not be very efficient, having slower internal virtual networking than physical, ESXi has no such problems.
My personal setup consists of a dual VMXNET3 adapter, one is in my main VLAN where all my computers are attached to, to serve as NAS. The other network card is connected to a different portgroup specifically for storage access from my ESXi hosts. This network card is configured with Jumbo frames (MTU 9000) inside the FreeNAS OS to provide maximum throughput. Don’t forget that the whole network it’s connected to also has to support Jumbo frames, that includes the virtual switch! The choice is yours, it also works fine with a single network card.
Storage (physical)
As I mentioned above, I have two deviced passed through, directly into the VM. One is the LSI 3008 SAS controller and the other is the NVMe M.2 SSD. But there was also the problem with the SATA controller not being able to be passed through, which I solved with RDM’s.
SAS Controller and NVMe
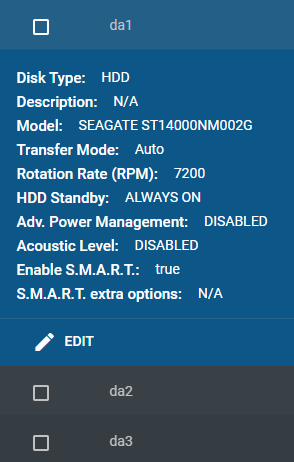
All disks attached to the LSI 3008 SAS controller are immediately visible in FreeNAS. I can see all their information and S.M.A.R.T. can be tested and read without problems. On the disk overview I see all three Seagates and the ADATA/XPG NVMe.
Check SAS controller presence
For the SAS controller you can verify if FreeNAS can see the hardware that was passed through with a CLI command from the Shell menu of FreeNAS. You can try the commands listed below, it only reads controller information, you can just try them both, nothing bad will happen.
# For SAS3 controllers like my LSI 3008 controller use:
sas3flash -listall

# For SAS2 controllers (these are a little older) use:
sas2flash -listall
RDM’s for SATA
A mentioned above, my Marvell SATA controller does not support PCI Passthrough, which means I just can’t directly attach the controller to the VM without having the hypervisor layer in between, which would be the easiest way, just like the SAS controller. However, there is another option for us ESXi users that, once again, is absolutely slammed by the FreeNAS community, RDM’s. A quick search on the web will show pretty much any thread regarding FreeNAS and RDM’s to advise you to avoid RDM’s at all cost. Some more research finds that all this information is based on some old facts for ESXi 3.x, a lot has changed and RDM’s work fine nowadays.
Please note, RDM’s have a lot of do’s and don’ts, it’s a very specific functionality to use LUN’s as disks on a remote system. In this case we are abusing this functionality for local disks. As mentioned in the disclaimer, this is not supported by VMware. Do this at your own risk, failure to understand how RDM’s work and bad configurations can possibly lead to corruption within FreeNAS. Please see the VMware documentation for all info regarding RDM’s.
Virtual vs Physical RDM’s
Virtual RDM’s will give you a lot of options and functionality compared to Physical RDM’s. Things like creating VM snapshots, cloning, migrating or any other functionality that includes the RDM will only be possible on a Virtual RDM. The catch is, to gain this functionality, ESXi will abstract part of the storage layer and handle I/O commands on the hypervisor. This is exactly the functionality that will possibly kill your FreeNAS sooner or later.
Bottomline: Never use Virtual RDM’s for FreeNAS disks!
That means, when using RDM’s for FreeNAS, Physical RDM’s should always be used. In this case ESXi doesn’t interfere with the storage layer, it forwards all commands directly to the hardware as if the hypervisor isn’t there. FreeNAS will see the RDM as a local disk and can interact with the disk as if it was a local one. You will see no difference between a disk on the SAS controller and the RDM disk. Things like S.M.A.R.T. will also work because of this.
Configuring RDM’s
SSH access to the ESXi host is required to set up local RDM’s, make sure you have the SSH service enabled for the host.
Log in to the ESXi host with SSH and use the following command to list your local disks:
ls -l /vmfs/devices/disksDepending on the number of disks in the server, the list can be quite long. Search for the disk names in the list, mine start with t10.<diskname><serialnumber>.
t10.ATA_____Samsung_SSD_860_EVO_1TB_________________S4X6NF0M847329D_____
t10.ATA_____Samsung_SSD_860_EVO_1TB_________________S4X6NF0M847334A_____
t10.ATA_____Samsung_SSD_860_EVO_1TB_________________S4X6NF0M847473B_____
t10.ATA_____Samsung_SSD_860_EVO_1TB_________________S4X6NF0M847568D_____
Copy the disks that need to be setup as an RDM to notepad, make sure to copy the full name, including all the underscores.
Next thing is to find the location where the RDM links/vmdk’s should be placed. I placed them on the datastore the FreeNAS VM resides on and put it in the VM’s folder as only this VM will use them. For me that’s “mbesxi_local_nvme/mbnas1”.
Now with the disks and the location for the RDM links combine them into the create RDM command, I simply call disk one -> rdm1, disk two -> rdm2, etc.
vmkfstools -z /vmfs/devices/disks/t10.ATA_____Samsung_SSD_860_EVO_1TB_________________S4X6NF0M847329D_____ "/vmfs/volumes/mbesxi_local_nvme/mbnas1/rdm1.vmdk"
vmkfstools -z /vmfs/devices/disks/t10.ATA_____Samsung_SSD_860_EVO_1TB_________________S4X6NF0M847334A_____ "/vmfs/volumes/mbesxi_local_nvme/mbnas1/rdm2.vmdk"
vmkfstools -z /vmfs/devices/disks/t10.ATA_____Samsung_SSD_860_EVO_1TB_________________S4X6NF0M847473B_____ "/vmfs/volumes/mbesxi_local_nvme/mbnas1/rdm3.vmdk"
vmkfstools -z /vmfs/devices/disks/t10.ATA_____Samsung_SSD_860_EVO_1TB_________________S4X6NF0M847568D_____ "/vmfs/volumes/mbesxi_local_nvme/mbnas1/rdm4.vmdk"
After running the above commands the rdm1 to rdm4 VMDK’s should be in the chosen location and are ready to be consumed by the FreeNAS VM.

Physical RDM VM configuration
With the RDM’s created in the above step, they can now be added to the FreeNAS VM. Again, there are a few things that need to be considered:
- A virtual storage controller with physical functionality is required.
- Make sure the RDM runs Physical mode.
The virtual storage controller should default to LSI Logic SAS when creating a VM in ESXi, but if there is a different SCSI controller, it will not work since those don’t have the physical disk functions in them. I like to keep my RDM’s on a separate controller, this is not based on any requirement or recommendation. You can also add the RDM’s to any LSI Logic SAS controller you have on the VM. Note, I have not tested with a SATA controller.
Now edit the FreeNAS VM settings and add a new LSI Logic SAS controller if you want to, if not, continue adding the RDM’s VMDK’s from the datastore. This is done by adding a new device “Existing Hard Disk” and not “RDM Disk”. In my screenshot you will see I added a new SCSI controller and added 3 existing hard disks to the new controller.
- (Optional) New controller: LSI Logic SAS
- Existing Hard Disk: rdm1.vmdk
- Compatibility Mode: Physical
- Mode: Independent Persistent
- (Optional) SCSI Controller: 1
- Repeat adding Existing Hard Disk for all RDM’s.

That’s it! Now all the RDM’s are available in the correct way, without any filtering from the Hypervisor storage layer. FreeNAS will recognize the disks and will be able to do everything with them as if they were directly attached as a local disk. You can not see the difference from within FreeNAS.
Now it’s time to configure the storage pools, which will be different for everyone and has nothing to do with ESXi anymore. Please see the FreeNAS documentation how to continue from this point on.